How To Expand Tubes In Fire Tube Boilers

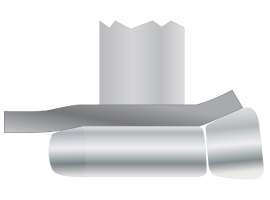
Firetube boiler tubes consist of an expanded and beaded tube end. The method for achieving a bead has advanced over the years to include both hand beading and single roll beading expanders. In order to ensure a proper bead, there are several steps that need to take place before expansion can occur. As a result, it’s important to be aware of industry best practices before starting a job.
Pre-Expansion Steps
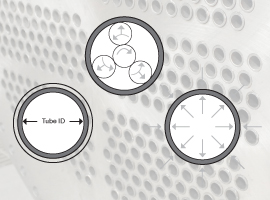
When the tube sheet is welded into the shell or if the main fire tube is welded to the sheet, the tube holes have a tendency to become oval-shaped. Since it is practically impossible to prevent this, it is advisable to pre-roll tube holes with a pre-rolling tool. This tool must be equipped with four expanding rolls to round out the tube hole and improve the seat. This rolling action also has a tendency to strengthen the ligament between the tube holes.
Once the tube sheet holes are prepped, tubes can be cut to length and inserted into the tube sheet. In smaller boilers, tubes can be cut to length and inserted into the tube holes. For larger boilers, it is best to cut all tubes approximately 3/4” to 1” longer than required. Insert the tubes in the tube holes and set them uniformly at one end, preferably the back end of the boiler, so that the ends of the tubes project 3/16” to 1/4” beyond the face of the tube sheet for the beading operation.
Traditional Expanding & Percussion Beading
One of the most common methods for beading tubes is with a pneumatic hammer and beading tool. Not only is this process hard on operators, but it’s also very time consuming depending on the number of tubes in the vessel.
Before the tube ends can be beaded, they will need to be expanded. This can be accomplished with a combination rolling and flaring expander. When expanding, the tube should be rolled sufficiently tight, so it doesn’t move as a result of the beading operation. At this point, it’s preferred to have an under-rolled joint because the beading operation has a tendency to move the tube end by a few thousandths. This will prevent any ligament damage during the beading process.
Once all of the tubes have been expanded, a pneumatic hammer and beading tool can be used to hand bead the tube. After beading has been completed, the tubes can be re-rolled with a straight expander. This final operation requires only a few seconds per tube to ensure uniform leak-proof joints.

Beading Tool
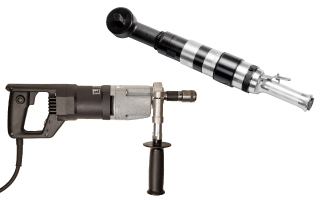
Using A Single Roll Beading Expander
All of the challenges experienced with the manual beading operation can be overcome using a single roll beading expander. Roll beading expanders simultaneously expand and bead the tube end in a single operation. The expander assures the creation of a joint, which is pressure-tight and has a bead in contact with the tube sheet. The expander achieves this objective by utilizing the natural feed forces built into the expander to push the beading roll against the end of the tube while expansion is taking place.
Select The Right Expander
The guide roll and the beading roll must be the proper size for the tube wall. Guide rolls that are too large or too small will prevent proper bead formation. Beading rolls operate on a range of wall thicknesses, but the best results are obtained by using the beading roll specifically designed for that tube gauge.
Check Tube Projection
Tubes must have the correct amount of projection from the tube sheet before starting. Tube projection refers to the distance between a tube end and the tube sheet. The amount of projection can vary depending on the tube diameter, wall thickness, tube sheet thickness, and whether or not the tube is square or has a flare due to the use of an internal type tube cutter. The normal range of tube projection is 3/16” – 9/32”. If the tube sheet is bowed or warped and is not parallel to the end of the tube, the desired projection should be measured at the midpoint so that half of the tube will have greater than the desired projection and half will have less than the desired projection.

Beading Roll

Roll Beading Fire Tube Boiler Tubes
Apply Coolant
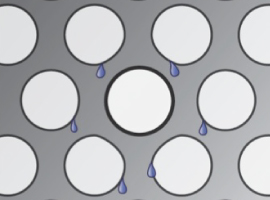
Coolant is necessary in order to reduce the heat created during the expansion process. If the expander overheats it may result in tube material flaking, premature tool failure, and poorly formed beads. In order to avoid these issues, it is recommended that you dip the roll end of the expander in a bucket of coolant between expansions. This will prevent the tool from overheating while also keeping it clean, extending the life of the rolls and mandrel.
Beading Tube Ends
Retract the mandrel and insert the tool into the tube until the bead roll is in contact with the end of the tube. Push the mandrel forward until the rolls make contact with the ID of the tube and adjust the mandrel stop to reflect the expansion requirement. Position the tube projection from the face of the tube sheet using the guide in the operating instructions for the specific tube OD being expanded. Start the expanding operation and continue until the mandrel stop nut is against the thrust bearing, next allow three additional revolutions of the mandrel to “iron out” the tube bead. Reverse the mandrel rotation and remove the expander from the tube. Verify the target ID and adjust the mandrel stop if needed. Inspect the bead and adjust the tube projection to achieve a “tight to the sheet” tube bead.
Upon completion of the expansion of one end of the boiler, the tube projection on the opposing end can be trimmed using a tube cutter.