Heat Exchanger Tooling:
Headers vs. Channels and How to Choose the Right Tools
In the heat exchanger industry, precision in language matters — and few examples illustrate this better than the terms header and channel. These two words are frequently used interchangeably in conversation and documentation, but they describe fundamentally different configurations that carry real consequences when it comes to selecting the right heat exchanger tooling. Understanding the distinction can save time, reduce costs, and help avoid the frustration of arriving on a job site with the wrong equipment.
Defining the Terms: Headers vs. Channels
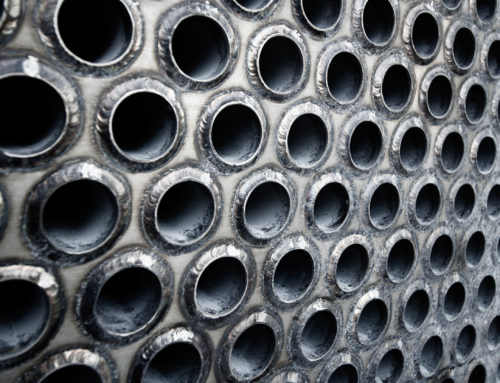
A channel is the end cap or enclosure on a shell and tube heat exchanger. It creates an open cavity between the operator and the tube sheet — essentially a hollow space that a technician may need to work within. Channels can vary considerably in size, though they commonly range from 18 to 36 inches in length. That depth presents a genuine ergonomic and logistical challenge: in many cases, channels cannot be easily removed, and on smaller vessels, it may be physically impossible for an operator to fit inside the space at all.
A header, by contrast, is a physical barrier between the operator and the tube sheet. Rather than working within an open space, the technician must work through the header — typically via a plug hole. This configuration is most common in air-cooled heat exchangers, where the tube sheet is only reachable by reaching through the header opening.
While both configurations present access challenges, they call for distinctly different approaches and tooling strategies.

Heat Exchanger Channel

Air Cooler Header
Heat Exchanger Tooling Strategies for Channels
Use drive extensions:
Because a channel is an open space rather than a physical barrier, the instinct to reach for long-reach tooling isn’t always the right one. Long-reach tools can be expensive and, in many channel applications, are simply unnecessary. A more cost-effective approach is to use standard tooling paired with a set of drive extensions. This allows the operator to position the expander collar, tube cutter, or other tooling against the tube sheet just as they normally would — the extensions simply bridge the gap created by the channel depth.
Account for corner access:
The geometry of a channel can create its own complications. The opening of the channel may restrict access to perimeter tubes, particularly in the corners. If the tooling footprint is too large to maneuver into tight areas, it may require specialty tools or more labor-intensive manual methods to complete the work.
Work from the opposite end of the vessel:
Another solution is working from the opposite end of the vessel. During a retube, for instance, it’s frequently easier to cut tubes behind the tube sheet on the channel side and then pull them from the opposite end of the vessel. This avoids the access constraints of the channel entirely and can significantly speed up the job.
Remove the channel:
If the channel can be removed, that is generally the preferred route. However, depending on how the vessel was fabricated, channel removal may be time-consuming or technically difficult — sometimes requiring its own planning and resources.

Heat Exchanger Tooling Strategies for Headers
Use long-reach tooling:
Working through a header presents a more straightforward tooling problem. Because the challenge is one of reach rather than confined space, long-reach tooling is typically the right solution. Extensions designed to pass through the plug hole or header opening allow operators to access the tube sheet and perform expanding, cutting, or cleaning operations without the spatial complexity that channels introduce.
Size tooling to the plug hole:
The constraints of a header are generally more predictable: the plug hole size defines the access window, and once tooling is sized to fit through that opening, the job proceeds much like standard tube work. In this respect, headers tend to be the more tooling-friendly configuration for technicians.
Why This Distinction Matters
Choosing the wrong tooling approach based on a misidentified component isn’t just inconvenient — it can lead to project delays, unnecessary equipment costs, and in some cases, incomplete or improper tube work. When scoping a job, it’s essential to identify early on whether you’re dealing with a header or a channel, and to fully assess the size constraints and accessibility limitations of the configuration.
In cases where standard tooling solutions won’t work — whether due to an unusually narrow channel, restricted corner access, or a non-standard header opening — specialty tooling may be the best option. However, that conversation needs to happen early in the planning process, not after the crew is already on site.
The Bottom Line
Taking the time upfront to understand your vessel’s configuration and communicate those details to your tooling supplier is the difference between a smooth job and expensive delays.