Heat Exchanger Tube Plugs: Steps, Types & Importance
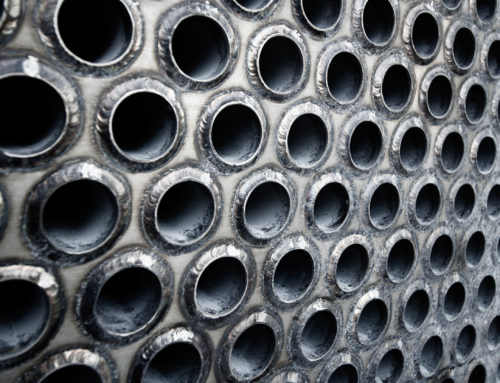
Plugging tubes are one of the most convenient ways to repair shell-and-tube types of heat exchangers. It can be an effective and reliable method to fix a heat exchanger when done properly. However, it could cause more harm than good if not executed carefully.
There are many reasons operators might need to plug tubes in a heat exchanger. In this article, we’ll dig deeper into the steps to an effective tube plugging in heat exchangers and the importance of correctly doing this process.
6 Steps For Effective Tube Plugging In Heat Exchangers
STEP 1- Identify the leaking tube. This can be done by looking for signs of corrosion and using a tube leak test gun. Once the leaking tube is found, it must be isolated from the other tubes in the heat exchanger.
STEP 2- Clean the ID of the tube where the plug will be installed. This includes removing any debris or corrosion that might be present.
STEP 3 – Vent the tube prior to plugging. Tube venting is a process by which a small puncture is made inside of the tube, releasing any pressure or chemicals that may be trapped inside. This reduces the risk of deposits filling the leak path and causing a build-up of pressure.
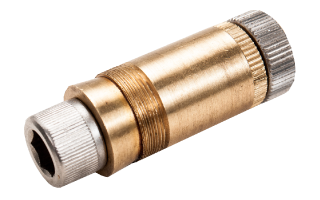
STEP 4- Once the area is cleaned, the tube can be plugged. There are a few different ways to do this, but one of the most common methods is to use a mechanical plug. This plug is inserted into the tube and then expanded to create a seal.
STEP 5- Once the plug is in place, it’s important to check for leaks. This can be done by doing a pressure test on the heat exchanger.
STEP 6- If there are no leaks, the heat exchanger can be returned to service.
3 Types Of Heat Exchanger Plugging Methods
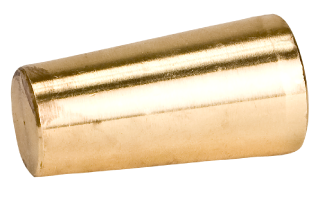
Tapered Plug: A tapered pin or one-piece plug is installed by tapping the end into the tube using a hammer or mallet until metal-to-metal contact is made. While this creates a tight seal it can crack the tube sheet or split the tube if installed improperly.
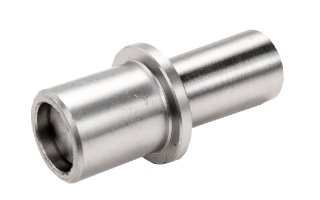
Ring & Pin: This two-piece styled plug consists of a bushing (ring) that sits inside the tube and a tapered plug (pin) that is hammered in through the bushing. By adding the secondary ring you are increasing the sealing area of the plug.
Mechanical Plug: A mechanical plug is designed to expand inside the tube, creating a positive mechanical seal. Because the seal takes place inside the tube end, it can be used in higher pressure applications. The advantage of this method is that it can be done relatively quickly and does not cause damage to the tube or tube sheet.
The Importance Of Proper Plug Installation
As we mentioned before, if done correctly, tube plugs can be an effective way to prolong the life of a heat exchanger. However, if not done properly, it could cause many problems:
Creating new leaks: If the tube ID isn’t cleaned properly or the plug isn’t inserted correctly, it could cause a new leak to form.
Damage to the heat exchanger tubes: If the plug is inserted too forcefully, it could damage the tube or tube sheet coating, which would need to be replaced.
Increased pressure: If the tube is not vented prior to plugging it can cause the heat exchanger to become over pressurized, leading to many problems, including leaks, damage to the heat exchanger, and even explosions.
Purchase Top-Quality Tube Plugs At Elliott Tool Technologies
As you can see, it’s very important that tube plugging is done correctly to avoid any further damage to the heat exchanger. Before you begin it’s important to make sure you have all the tooling you’ll need for the job. At Elliott Tool Technologies, we’ve got Mechanical Tube Plugs, One-Piece Tube Plugs, and Two-Piece Tube Plugs to suit a variety of applications.
For over 125 years, we have been known as the original tube tool company. You can count on us for high-quality products to keep your operation running smoothly. No more dealing with leaky tubes! Contact us today to get more information about our products.